After growing the roots over the summer, storing them for months in the refrigerator, and forcing the roots to bud in our furnace room, it is time to try them in the kitchen!
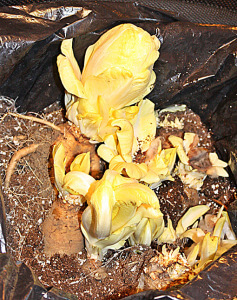
The witloof roots had been pack away in a warm corner next to the furnace, and after four weeks I had a couple of buds, or chicons, ready to use. One was about twice the size of the ones you find in the grocery store. I decided that it could be split and braised to be a side dish with dinner.
Braised Belgian Endives*
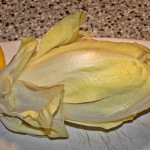
Belgian Endive, trimmed and cored*
1 tablespoon butter
juice of 1/2 lemon, about 1 to 1 1/2 tablespoons
1 tablespoon water
1/4 teaspoon salt
dash pepper
1 teaspoon sugar
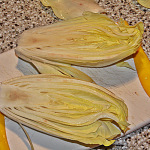
*To core the endive, slice about 1/8 to 1/4-inch off the end and cut out the small core
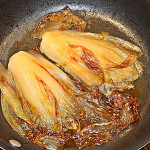
Saute endive in butter over medium heat, turning several times. Add remaining ingredients. Cover and simmer for 20 to 25 minutes.
The endives have a slight tanginess that the lemon accentuates. The long simmer did some carmelizing, which made a nice background for the tartness. The endive made a nice accent with some baked pork ribs.
The remaining chicons from this small planting will let us experiment with a few more dishes- I have a soup to try, and some of the small leaves will go in salads.
I will definitely plant this again in our garden, with some adjustments. There will be more amendments to the soil (we have a huge compost heap to work with), which will make it easier for the carrots and Belgian Endives to stay narrow and not split. Once the roots are lifted, they will temper in a shelter so our helpful deer won’t get a chance to trim them too short. Of course, I trimmed the tops too tight on my own, so I will need to rein in my enthusiasm with the clippers. When forcing the roots to bud, I will need to avoid moisture on the growing surfaces- when I tried misting the roots I created a mold problem that ruined several plants.
This is the end of our gardening season- time to work over the catalogs and plan out the plots for spring. We are still working through garlic, carrots, and leeks that we stored from the garden. Once the ground thaws there will be lots of things to do, but that won’t be for several weeks- right now it is nice to see a little snow cover (if for no other reason than it means we won’t be mowing the grass anytime soon!)
First post of series
Second post of series
Windtamer wind turbines
Though the Windtamer looks more like an outdoor PA speaker than a windmill, it’s inventor is claiming it has much higher efficiencies than the traditional propeller type wind turbines.
We live in a breezy area- if you like to fly kites, we have some open space in our back yard that is ideal for you. Much of this area is embroiled in discussions about large commercial wind turbines, which are very controversial and has pitted neighbor against neighbor as the rules are being hammered out. Recently, our friends Lynda and Bob Dobberstein of Abner Adams House B&B revealed that they were in the process of getting a small wind turbine that can power their house. They are in the village of Bloomfield, NY, with neighbors they like, so clearly they were not planning a tall tower and turbine. It turns out that they are going to be one of the early installations of the Windtamer turbines, which uses some new technologies to overcome many of the problems of traditional propeller-driven turbines.
We were invited to a “show and tell” open house at the “Windtamer”:http://www.windtamerturbines.com/ facility in Geneseo, about 1 1/2 hours from us, near Letchworth State Park. The little warehouse was full of people getting information on the units- clearly there is a lot of interest in wind power. We ended up in conversation with the inventor and CEO of Windtamer, Jerry Brock. Jerry is pretty animated when talking about his product, and the progress they are making as they roll into production. He is also familiar with the Penn Yan area, and thinks that our wind patterns are well suited to small wind turbines. They offer a turn-key installation- they not only do all the site prep, installation, and utility hook-up, they handle the permit process as well.
The Windtamer is attractive on several levels. It boasts higher efficiencies due to the unique shroud and propeller. The shroud also eliminates bird/bat strikes. The turbine uses many short blades, which helps it to run silently. The installation is on a relatively short pier, and no guy-wires are needed (much easier to mow around). The Windtamer also claims to be able to run in any wind condition- it is producing a steady stream of electricity when most turbines have to shut down to protect the generator. A definite plus is that Jerry Brock is a local guy with a great idea, and he is keeping the company local. A company using new technology, environmentally beneficial, creating jobs in the area- what is not to like!
Belgian Endives Part III
After growing the roots over the summer, storing them for months in the refrigerator, and forcing the roots to bud in our furnace room, it is time to try them in the kitchen!
The witloof roots had been pack away in a warm corner next to the furnace, and after four weeks I had a couple of buds, or chicons, ready to use. One was about twice the size of the ones you find in the grocery store. I decided that it could be split and braised to be a side dish with dinner.
Braised Belgian Endives*
Belgian Endive, trimmed and cored*
1 tablespoon butter
juice of 1/2 lemon, about 1 to 1 1/2 tablespoons
1 tablespoon water
1/4 teaspoon salt
dash pepper
1 teaspoon sugar
*To core the endive, slice about 1/8 to 1/4-inch off the end and cut out the small core
Saute endive in butter over medium heat, turning several times. Add remaining ingredients. Cover and simmer for 20 to 25 minutes.
The endives have a slight tanginess that the lemon accentuates. The long simmer did some carmelizing, which made a nice background for the tartness. The endive made a nice accent with some baked pork ribs.
The remaining chicons from this small planting will let us experiment with a few more dishes- I have a soup to try, and some of the small leaves will go in salads.
I will definitely plant this again in our garden, with some adjustments. There will be more amendments to the soil (we have a huge compost heap to work with), which will make it easier for the carrots and Belgian Endives to stay narrow and not split. Once the roots are lifted, they will temper in a shelter so our helpful deer won’t get a chance to trim them too short. Of course, I trimmed the tops too tight on my own, so I will need to rein in my enthusiasm with the clippers. When forcing the roots to bud, I will need to avoid moisture on the growing surfaces- when I tried misting the roots I created a mold problem that ruined several plants.
This is the end of our gardening season- time to work over the catalogs and plan out the plots for spring. We are still working through garlic, carrots, and leeks that we stored from the garden. Once the ground thaws there will be lots of things to do, but that won’t be for several weeks- right now it is nice to see a little snow cover (if for no other reason than it means we won’t be mowing the grass anytime soon!)
First post of series
Second post of series
Belgian Endives Part II
The Belgian Endive experiment continues…the roots survived the months in the refrigerator, so it is time to plant them and bring them back to life.
Susan ran across my bag of muddy roots (see the post called ‘Belgian Endives’) in the fridge and suggested that it was time to do something with them. Even with the excessive trimming that the deer and I had inflicted before putting them in storage, the roots came out of two months of refrigeration in good shape. I lined a milk crate with a black trash bag and scooped some soil-less planter medium (peat moss and vermiculite) into the bag. The roots were packed together, and more medium spread around them so that the roots were well supported. I watered the mix slightly, so that a handful of medium would pack, but no water would squeeze out.
The witloof (Belgian endive) requires warm temperatures to start budding, and needs to be kept out of light to stay blanched. I tied off the black plastic bag to make a light-proof tent, and put it in our furnace room to stay warm. The bag will need to be opened every few days to circulate the air and prevent mustiness. We should have some chicons ready in 20 days or so.
Previous article- ‘Belgian Endives”
Following Article- ‘Belgian Endives III’